Bridge your Existing ERC20 token to all chains with ITS using the Ethereum Boilerplate
If you have an ERC-20 token on one or more blockchains and want to make the token interoperable across chains, the Interchain Token Service provides a solution. You can transform an ERC-20 token into an Interchain Token by deploying a token manager.
Each token can only be registered once as a Canonical Interchain Token, ensuring unique and streamlined token management across different blockchains. Though you can register your Canonical Interchain Token directly through the Interchain Token Portal, there are times when you may want to do so programmatically, such as when you have already deployed a token on one chain and wish to deploy a wrapped version of that token on another chain.
In this tutorial, you will learn how to programmatically create a Canonical Interchain Token from scratch using Axelar’s Interchain Token Service.
Moralis offers industry-leading tools that make interchain Web3 development more accessible for millions worldwide. Let's build a Moralis dapp with our Ethereum Boilerplate that integrates Axelar Interchain Token Service to build multichain tokens. It's effortless!
💡 You can find the complete code for this tutorial on GitHub.
Prerequisites
You will need:
- A basic understanding of JavaScript and React.
- A MetaMask wallet with FTM and Celo funds for testing. If you don't have these funds, you can get FTM from the Fantom faucet and CELO from the Celo Alfajores faucets (1, 2).
Project setup and installation
To quickly set up your development environment, clone this project on GitHub using the following command:
git clone https://github.com/Olanetsoft/bridge-existing-ERC20-token-with-ITS.git
💡 Make sure you're on the starter branch.
Install dependencies
Next, change the directory into the cloned folder and install the project dependencies locally using yarn with the following command:
cd bridge-existing-ERC20-token-with-ITS && yarn install
yarn run dev
yarn run dev will start a Next.js hot-reloading development environment accessible by default at http://localhost:3000.

The cloned project includes several folders:
- contracts: This folder contains the contract ABIs that we'll use in this project to interact with the Interchain Token Service contract.
- src: This folder contains component templates that you'll use to implement the creation of the Interchain Token, its remote deployment, and the cross-chain token transfer.
- pages: This folder contains different pages within the application.
- cypress: This folder contains basic Cypress tests.
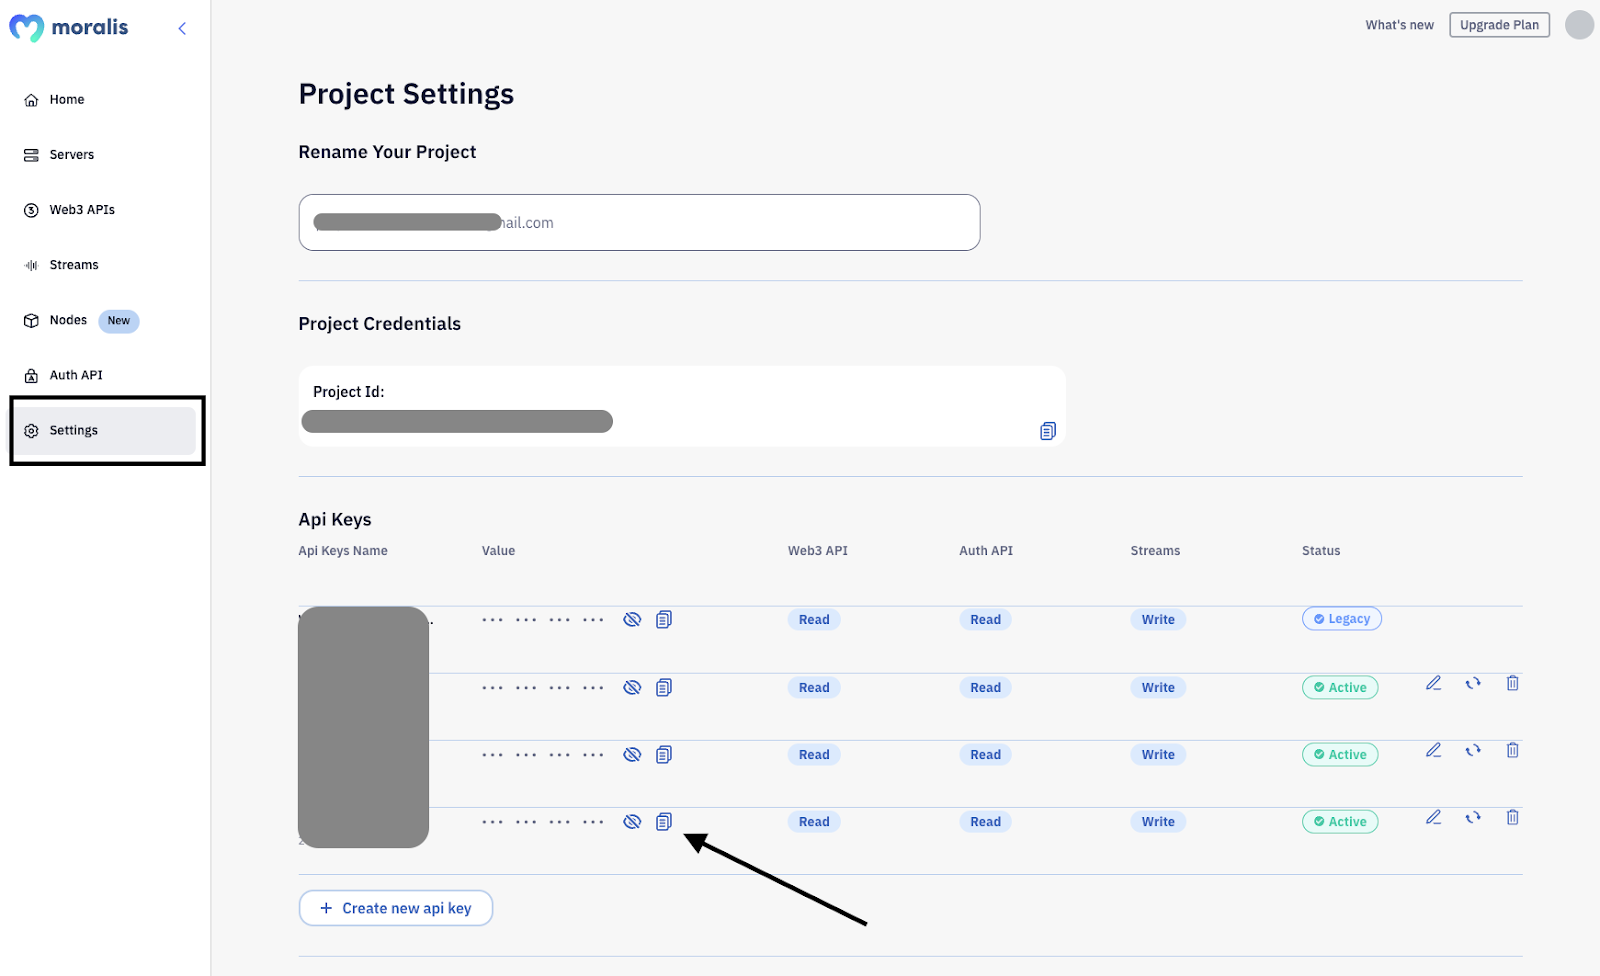
Rename .env.local.example to .env.local and provide required data. Get your Web3 Api Key from the Moralis dashboard.
Fill the environment variables in your .env.local file in the app root:
-   MORALIS_API_KEY: You can get it [here](https://admin.moralis.io/web3apis).

-   NEXTAUTH_URL: Your app address. In the development stage, use [http://localhost:3000](http://localhost:3000).

-   NEXTAUTH_SECRET: Used for encrypting JWT tokens of users. You can put any value here or generate it on [https://generate-secret.now.sh/32](https://generate-secret.now.sh/32).
Example:
MORALIS_API_KEY=xxxx

NEXTAUTH_URL=http://localhost:3000

NEXTAUTH_SECRET=7197b3e8dbee5ea6274cab37245eec212
Create and Deploy a new ERC20 token on Fantom
Create a SimpleERC20 token and give it a name and symbol. If you already have an ERC-20 token deployed on the Fantom testnet, skip this step.
Register your existing ERC20 token as a canonical interchain token
You are set up and good to start implementing the functionality to register your existing token as a canonical interchain token to allow your token bridgeable on other chains.
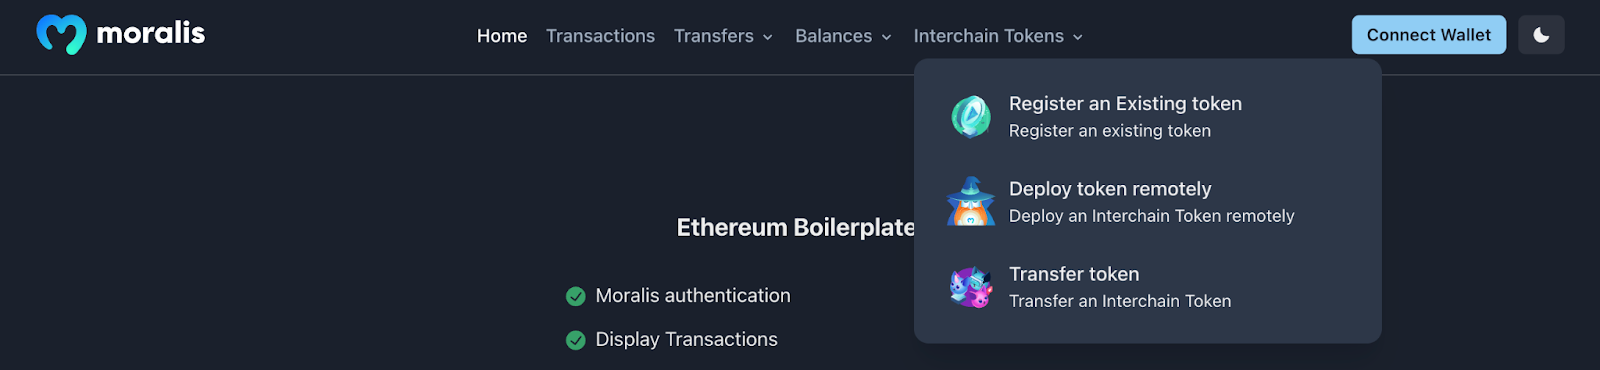
On the navigation bar, you'll see an option for Interchain Tokens. Clicking on it will display a UI similar to the following, but it won’t be functional yet. You will add functionality in this section of the tutorial.

Import the Interchain Token Factory ABI and contract addresses
Navigate to the src/components/interchain/register-token folder and open the register-token.tsx file, then add the following code:
//...

import interchainTokenFactoryContractABI from "../../../../../contracts/InterchainTokenFactoryABI.json";

const interchainTokenFactoryContractAddress =
  "0x83a93500d23Fbc3e82B410aD07A6a9F7A0670D66";

const RegisterExistingToken: React.FC = () => {
  //...
};
Create state variables to save the token info from the UI
Add the following code to set up state variables to collect token information from the UI. This data will be used to interact with the contract.
//...

const RegisterExistingToken: React.FC = () => {
  //...

  const [tokenAddress, setTokenAddress] = useState < string > "";

  //...
};
Implement register canonical token functionality
wagmi is already installed in the cloned project. Use useContractWrite() and useWaitForTransaction() to interact with the InterchainTokenFactory contract:
//...
const RegisterExistingToken: React.FC = () = >{
  //...
  // Register existing token
  const {
    data: registerToken,
    write
  } = useContractWrite({
    address: interchainTokenFactoryContractAddress,
    abi: interchainTokenFactoryContractABI,
    functionName: 'registerCanonicalInterchainToken',
    args: [tokenAddress, // your token address
    ],
    mode: 'recklesslyUnprepared',
  });
  const {
    data: useWaitForDeployTokenTransactionData,
    isSuccess,
    isError,
    isLoading,
  } = useWaitForTransaction({
    hash: registerToken ? .hash,
  });
  // Method to handle token registration to be used in the 'Register' button
  // onClick event
  const handleRegisterToken = async() = >{
    if (!tokenAddress) {
      toast({
        title: 'Invalid Input',
        description: 'Please fill the field correctly.',
        status: 'error',
        duration: 5000,
        isClosable: true,
      });
      return;
    }
    write();
    toast({
      title: 'Transaction Submitted',
      description: 'Please confirm the transaction in MetaMask.',
      status: 'info',
      duration: 5000,
      isClosable: true,
    });
  };
  return (
  //...
  )
}
Track transaction status and update the UI
Add the following code to track the transaction status after triggering the registerCanonicalInterchainToken() method. To do this, you will need to add the following code in another useEffect hook:
 //...
const RegisterExistingToken: React.FC = () = >{
  //...
  useEffect(() = >{
    if (isSuccess) {
      setDisplayTransactionHash(registerToken ? .hash ? ?'');
      toast({
        title: 'Token Registration Successful',
        status: 'success',
        duration: 5000,
        isClosable: true,
      });
      // Clear only the input fields
      setTokenAddress('');
      setShowNextStep(true);
    }
    if (isError) {
      toast({
        title: 'Transaction Error',
        description: 'There was an error submitting your transaction.',
        status: 'error',
        duration: 5000,
        isClosable: true,
      });
    }
    if (isLoading) {
      toast({
        title: 'Transaction Pending',
        description: 'Your transaction is pending.',
        status: 'info',
        duration: 5000,
        isClosable: true,
      });
    }
  },
  [registerToken, isSuccess, isError, isLoading, useWaitForDeployTokenTransactionData]);
  return (
  //...
  )
}
Update UI to implement the register token functionality
Thus far, you have successfully implemented the interaction to the registerCanonicalInterchainToken()function on the InterchainTokenFactory contract. The next step is to connect this function to the user interface you cloned earlier by updating the code with the following snippet:
//...

const RegisterExistingToken: React.FC = () => {
  //...

  return (
    <Box
      padding="7"
      maxW="xxl"
      borderWidth="1px"
      borderRadius="lg"
      overflow="hidden"
      margin="auto"
      marginTop="-20"
    >
      <Heading size="lg" marginBottom="6" textAlign="center">
        Register Canonical Interchain Token
      </Heading>

      <VStack spacing={5} align="stretch">
        <FormControl>
          <FormLabel>Token Address </FormLabel>

          <Input
            placeholder="Enter token address"
            value={tokenAddress} // updated
            onChange={(e) => setTokenAddress(e.target.value)} // updated
          />

          <FormHelperText>
            Enter your existing token address you already deployed
          </FormHelperText>
        </FormControl>

        <div style={{ display: "flex", justifyContent: "space-between" }}>
          <Button
            colorScheme="cyan"
            loadingText="Creating Token"
            w="sm"
            variant="solid"
            onClick={handleRegisterToken} // update here
          >
            Register Token
          </Button>

          {/*  ...  */}
        </div>

        {/*  ...  */}
      </VStack>
    </Box>
  );
};
Ensure you replace {/ ... /} with the actual code. This placeholder prevents the repetition of existing code in the codebase.
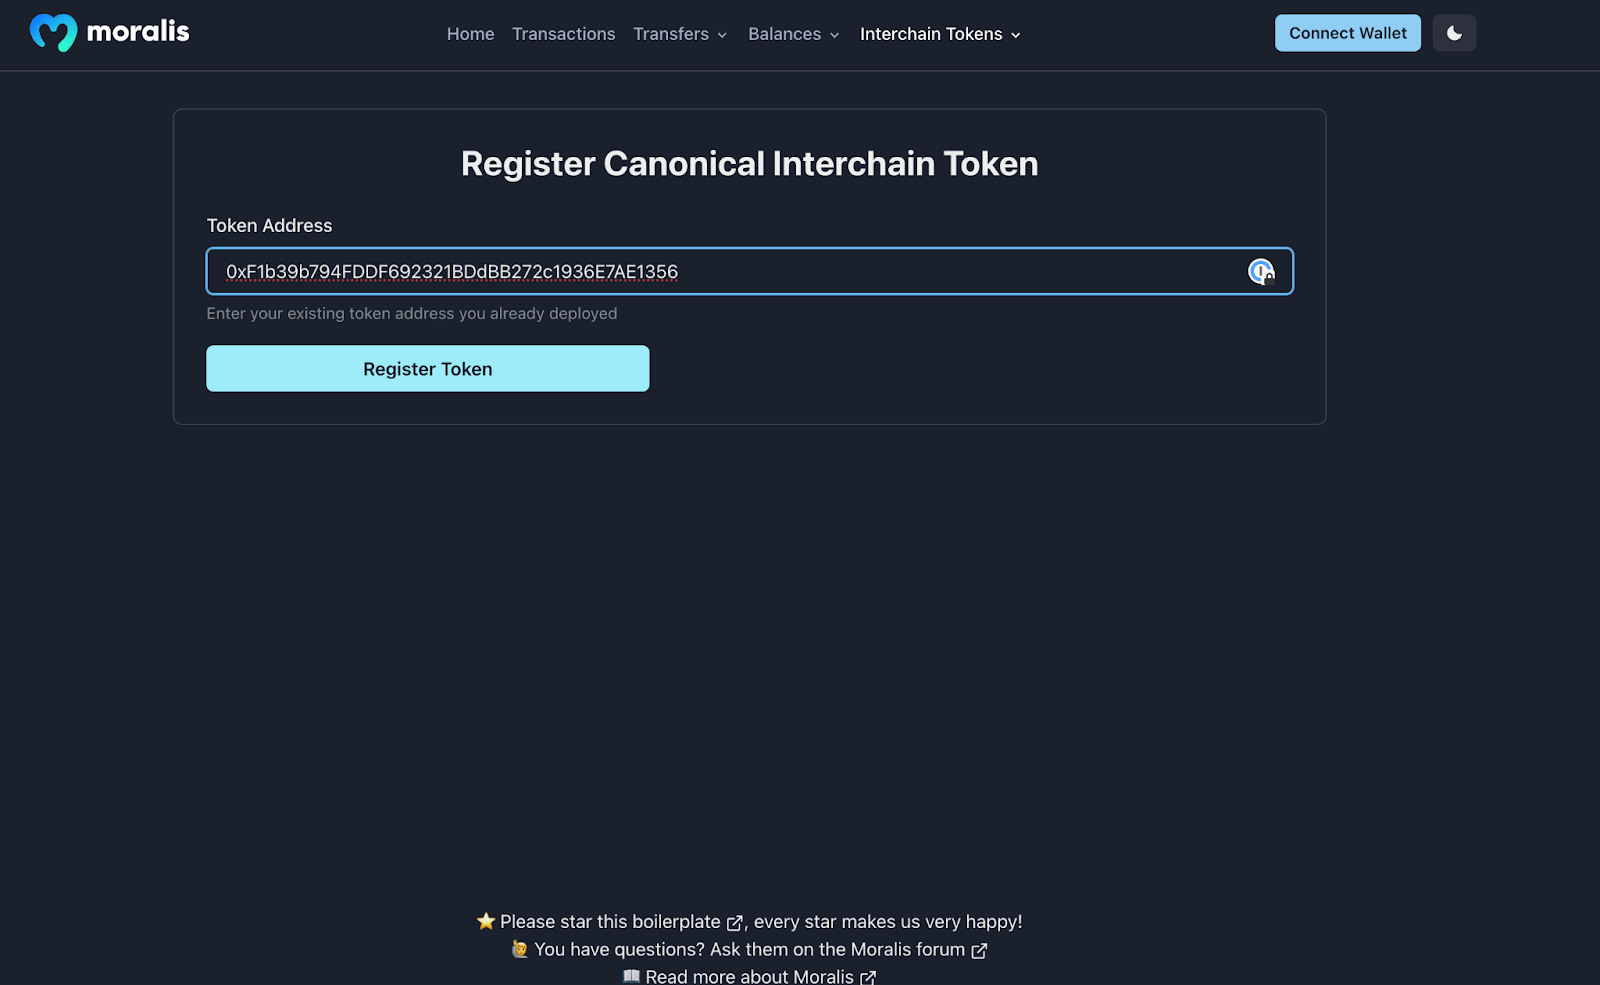
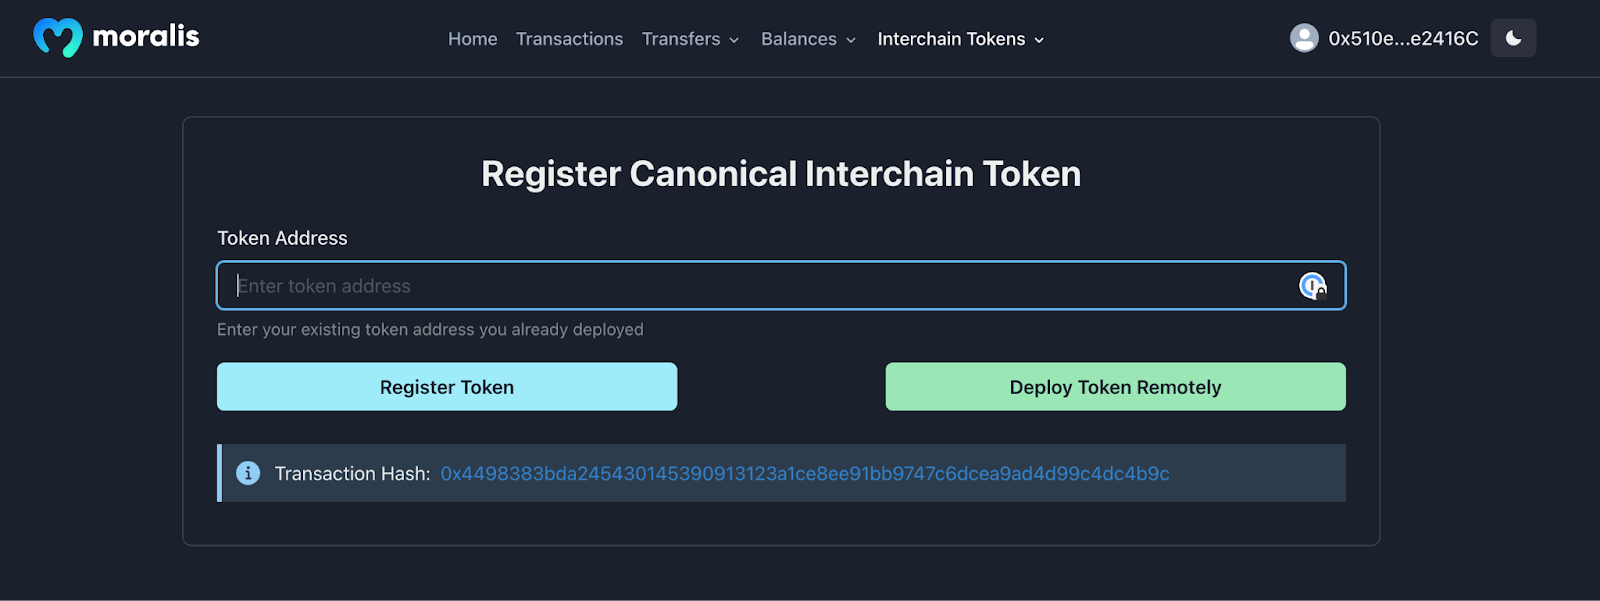
Test the application to register an existing ERC20 token as an Interchain Token
The example below demonstrates registering an existing ERC20 token by pasting the token's address.
Check the transaction on the Fantom testnet scanner
Check the Fantom testnet scanner to see if you have successfully registered and locally registered a new Interchain Token on the Fantom testnet.
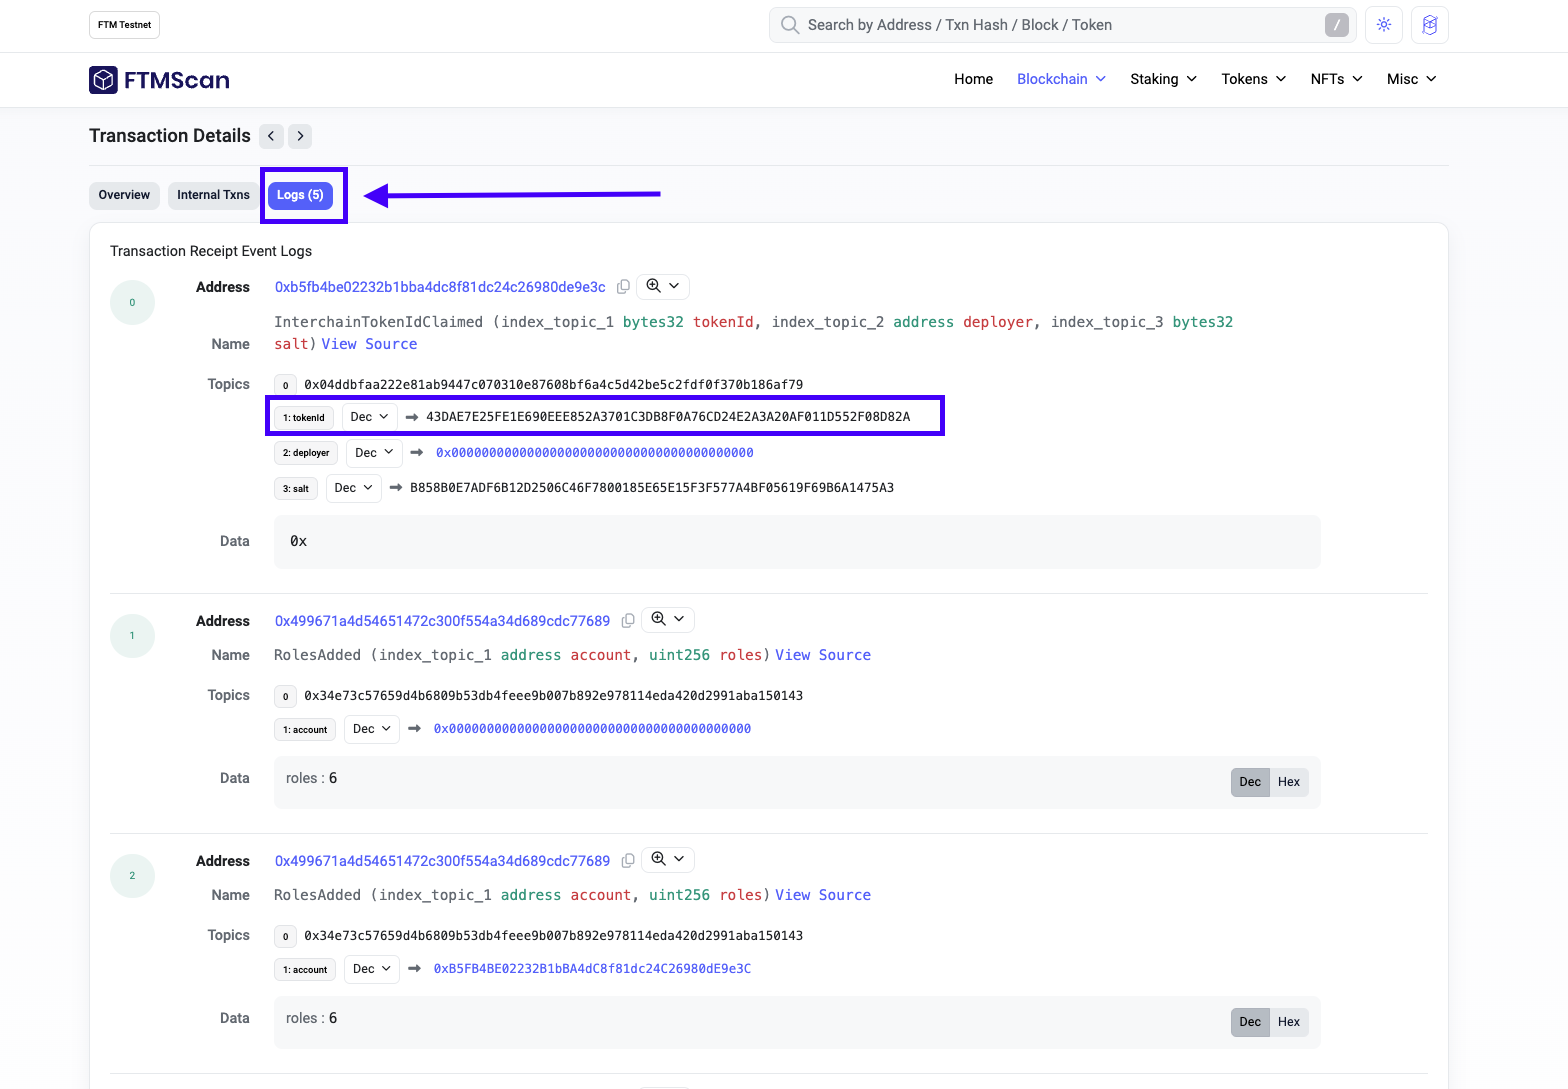
Store the token ID
Later in this tutorial, when you want to transfer token between chains using interchainTransfer() on ITS you will need to pass in the token ID. Get the token ID from the transaction log and save it somewhere as shown below.
Deploy remote canonical Interchain Token
You've successfully registered an existing token as an Interchain Token to Fantom. Next, deploy it to Celo, which will serve as the remote chain in this tutorial.
💡 Any two chains can be specified as your local and remote chains.
Navigate to the src/components/interchain/deploy-token folder and open the deploy-token.tsx file. This is where you will implement the remote token deployment functionality.
Create state variables to save the token info from the UI
You need to create state variables to collect token information from the UI. This data will be used to interact with the contract and deploy your token remotely. Use the following code to create these variables:
//...
const DeployTokenRemotely = () = >{
  //...
  const[sourceChain, setSourceChain] = useState < string > "";
  const[destinationChain, setDestinationChain] = useState < string > "";
  const[tokenAddress, setTokenAddress] = useState < string > "";
  //...
};
Estimate gas fees
To remotely deploy a remote canonical Interchain Token, you need to estimate the gas fee for the cross-chain call. You can use the Axelar JS SDK to estimate this fee in your React application.
Update the deploy-token.js file:
//...
const DeployTokenRemotely = () = >{
  //...
  const api: AxelarQueryAPI = new AxelarQueryAPI({
    environment: Environment.TESTNET
  });
  const[gasAmount, setGasAmount] = useState < number > (0);
  // Estimate Gas
  const gasEstimator = async() = >{
    try {
      const gas = await api.estimateGasFee(sourceChain, destinationChain, GasToken.FTM, 700000, 2);
      setGasAmount(Number(gas));
    } catch(error) {
      console.error('Error estimating gas fee: ', error);
    }
  };
  return (
  //..
  )
}
Implement remote token deployment
Next, implement the remote token deployment functionality. Do this by invoking the deployRemoteCanonicalInterchainToken() function on the InterchainTokenFactory contract. Use the following code and specify the required parameters: sourceChain, tokenAddress, address, destinationChain, gasValue, and the cross-chain gas value:
 //...
const DeployTokenRemotely = () = >{
  //...
  // Deploy a token remotely
  const {
    data: deployTokenRemotely,
    write
  } = useContractWrite({
    address: interchainTokenFactoryContractAddress,
    abi: interchainTokenFactoryContractABI,
    functionName: 'deployRemoteCanonicalInterchainToken',
    args: [sourceChain, tokenAddress, destinationChain, ethers.BigNumber.from(gasAmount.toString())],
    overrides: {
      value: ethers.BigNumber.from(gasAmount.toString()),
    },
    mode: 'recklesslyUnprepared',
  });
  const {
    data: useWaitForDeployTokenRemotelyTransactionData,
    isSuccess,
    isError,
    isLoading,
  } = useWaitForTransaction({
    // Calling a hook to wait for the transaction to be mined
    hash: deployTokenRemotely ? .hash,
  });
  const handleDeployToken = async() = >{
    if (write) {
      write();
      toast({
        title: 'Transaction Submitted',
        description: 'Please confirm the transaction in MetaMask.',
        status: 'info',
        duration: 5000,
        isClosable: true,
      });
    }
    if (isError) {
      toast({
        title: 'Transaction Error',
        description: 'There was an error submitting your transaction.',
        status: 'error',
        duration: 5000,
        isClosable: true,
      });
    }
  };
  return (
  //..
  )
}
Track transaction status and update the UI
Add the following code to track the transaction status after triggering the deployRemoteCanonicalInterchainToken() method. To do this, you will need to add the following code in useEffect hook:
//...
const DeployTokenRemotely = () = >{
  //...
  useEffect(() = >{
    gasEstimator();
    if (isSuccess) {
      setDisplayTransactionHash(deployTokenRemotely ? .hash ? ?'');
      toast({
        title: 'Token Deployed Remotely',
        status: 'success',
        duration: 5000,
        isClosable: true,
      });
      setShowNextStep(true);
    }
    if (isError) {
      toast({
        title: 'Transaction Error',
        description: 'There was an error submitting your transaction.',
        status: 'error',
        duration: 5000,
        isClosable: true,
      });
    }
    if (isLoading) {
      toast({
        title: 'Transaction Pending',
        description: 'Your transaction is pending.',
        status: 'info',
        duration: 5000,
        isClosable: true,
      });
    }
  },
  [deployTokenRemotely, isSuccess, isError, isLoading, useWaitForDeployTokenRemotelyTransactionData]);
  return (
  //..
  )
}
Update the UI to implement the remote token deployment functionality
So far, you have successfully implemented the interaction for the deployRemoteCanonicalInterchainToken() function on the InterchainTokenFactory contract. Now connect this function to the user interface you cloned earlier by updating your code with the following snippet:
return (
  <Box
    padding="7"
    maxW="xxl"
    borderWidth="1px"
    borderRadius="lg"
    overflow="hidden"
    margin="auto"
    marginTop="-20"
  >
    {/* ... */}
    <VStack spacing={5} align="stretch">
      <FormControl>
        <FormLabel>Source chain</FormLabel>
        <Stack spacing={3}>
          <Select
            placeholder="Select source chain"
            size="md"
            onChange={(e) => {
              setSourceChain(e.target.value);
            }}
            value={sourceChain}
          >
            {/* ... */}
          </Select>
        </Stack>
        <FormHelperText>
          Source chain for your token e.g., Fantom, Binance, Polygon, etc.
        </FormHelperText>
      </FormControl>

      <FormControl>
        <FormLabel>Token Address</FormLabel>
        <Input
          placeholder="Enter your token address"
          value={tokenAddress}
          onChange={(e) => setTokenAddress(e.target.value)}
        />
        <FormHelperText>
          Enter the token address you already deployed
        </FormHelperText>
      </FormControl>

      <FormControl>
        <FormLabel>Destination chain</FormLabel>
        <Stack spacing={3}>
          <Select
            placeholder="Select Destination chain"
            size="md"
            onChange={(e) => {
              setDestinationChain(e.target.value);
            }}
            value={destinationChain}
          >
            {/* ... */}
          </Select>
        </Stack>
        <FormHelperText>
          Destination chain for your token e.g., Fantom, Binance, Polygon, etc.
        </FormHelperText>
      </FormControl>

      <div style={{ display: "flex", justifyContent: "space-between" }}>
        <Button
          colorScheme="cyan"
          loadingText="Deploying Token Remotely..."
          w="sm"
          variant="solid"
          onClick={handleDeployToken}
          isLoading={isLoading}
          disabled={isLoading}
        >
          Deploy Token
        </Button>
        {/* ... */}
      </div>
      {/* ... */}
    </VStack>
  </Box>
);
💡 Make sure to replace {/ ... /} with the actual code. This placeholder prevents the repetition of existing code in the codebase.
Test the application to deploy the Interchain Token remotely
Select Fantom as the source chain and Celo as the destination chain, then your token address as shown below:
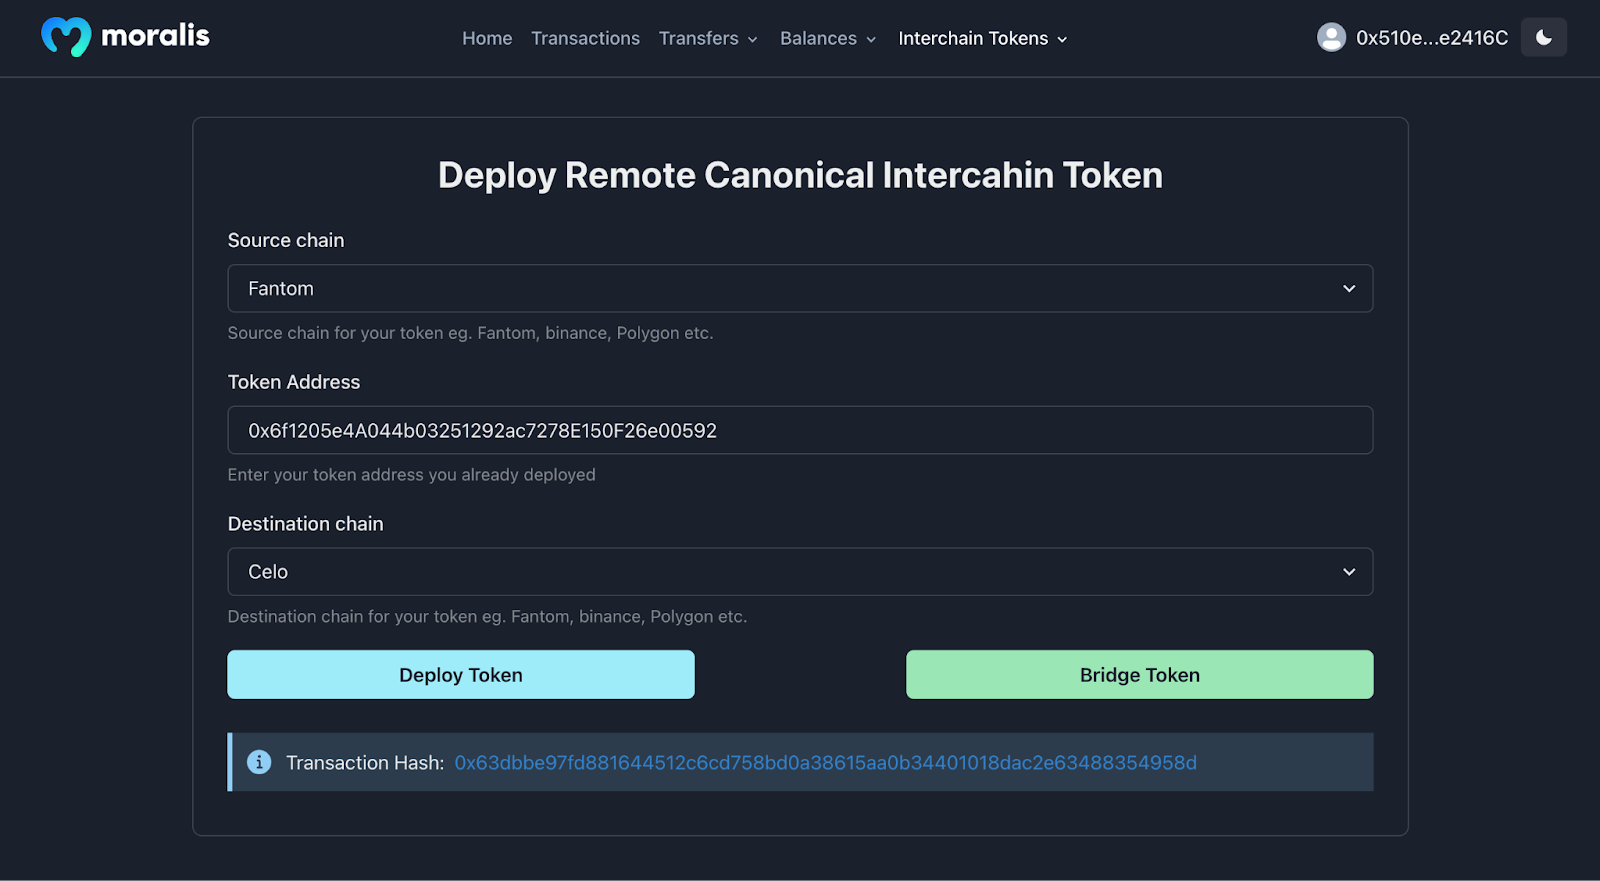
Check the transaction on the Axelar testnet scanner
Check the Axelarscan testnet scanner to see if you have successfully created and remotely deployed your token on the Celo testnet. It should look something like this. Ensure that Axelar shows a successful transaction before continuing to the next step.
If you got this far, good job! You are almost done with the tutorial.
Transfer your token between chains
Now that you've successfully created and deployed your new Interchain Token on the Fantom and Celo testnets, you can transfer tokens between chains seamlessly via the user interface.

Navigate to the src/components/interchain/transfer-token folder and open the transfer-token.tsx file, where you will implement the token transfer functionality.
Create state variables to save the token info from the UI
You need to create state variables to collect token information from the UI and also set buttons visibility:
  //...
const TransferToken = () = >{
  //...
  const[sourceChain, setSourceChain] = useState < string > ('');
  const[destinationChain, setDestinationChain] = useState < string > ('');
  const[receiverAddress, setReceiverAddress] = useState < string > ('');
  const[amountToTransfer, setAmountToTransfer] = useState < number > (0);
  const[interchainTokenContractAddress, setInterchainTokenContractAddress] = useState < string > ('');
  const[approveButonVisibility, setApproveButtonVisibility] = useState < boolean > (true);
  const[formVisibility, setFormVisibility] = useState < boolean > (false);
  return (
  //...
  )
}
Approve the token to be spent by the Interchain Token Service(ITS) contract
Canonical (pre-existing) token requires approval due to locking, so you need to approve ITS to be able to spend the amount you want to transfer.
Update transfer-token.js file with the following code snippet:
// transfer-token.js
//...
const TransferToken = () = >{
  //...
  // Approve token to be spent by the contract
  const {
    data: useContractWriteSpendData,
    write: approveWrite
  } = useContractWrite({
    address: '0x6f1205e4A044b03251292ac7278E150F26e00592',
    // Address of the token contract on Fantom
    abi: erc20ABI,
    functionName: 'approve',
    args: [interchainTokenServiceContractAddress, ethers.utils.parseUnits(amountToTransfer.toString(), 18)],
    mode: 'recklesslyUnprepared',
  });
  const {
    data: useWaitForTransactionSpendData,
    isSuccess: isSpendSuccess,
    isLoading: isSpendLoading,
  } = useWaitForTransaction({
    hash: useContractWriteSpendData ? .hash,
  });
  // Handle Approval
  const handleApprove = () = >{
    if (!amountToTransfer) {
      toast({
        title: 'Please enter amount',
        status: 'error',
        duration: 5000,
        isClosable: true,
      });
      return;
    }
    approveWrite();
    toast({
      title: 'Approving Token...',
      description: 'Please confirm the transaction in Metamask.',
      status: 'info',
      duration: 5000,
      isClosable: true,
    });
  };
  return (
  //..
  )
}
### Estimate gas fees

You’ll need to estimate the gas fee for the cross-chain call to transfer tokens remotely. You can use the Axelar JS SDK to estimate this fee. Update the transfer-token.js file using the following:
// transfer-token.js
* ***
//...
const TransferToken = () = >{
  //...
  const api: AxelarQueryAPI = new AxelarQueryAPI({
    environment: Environment.TESTNET
  });
  const[gasAmount, setGasAmount] = useState < number > (0);
  // Estimate Gas
  const gasEstimator = async() = >{
    try {
      const gas = await api.estimateGasFee(sourceChain, destinationChain, GasToken.FTM, 700000, 2);
      setGasAmount(Number(gas));
    } catch(error) {
      console.error('Error estimating gas fee: ', error);
    }
  };
  return (
  //..
  )
}
Implement token transfer
To implement the token transfer, invoke the interchainTransfer() function on the created Interchain Token contract. Use the following code and specify the necessary parameters: tokenId, destinationChain, receiverAddress, amount, gasValue, '0x', and the cross-chain gas value.
Remember the token ID you saved earlier in this tutorial when you registered your existing token as a canonical InterchainToken? This is where you need to use it.
Add `0x` in front of the tokenID like this 0x<yourtokenid>.
//...
const TransferToken = () = >{
  //...
  // Token Transfer
  const {
    data: tokenTransfer,
    write
  } = useContractWrite({
    address: interchainTokenServiceContractAddress,
    abi: interchainTokenServiceContractABI,
    functionName: 'interchainTransfer',
    args: [ethers.utils.arrayify('0x43DAE7E25FE1E690EEE852A3701C3DB8F0A76CD24E2A3A20AF011D552F08D82A'), destinationChain, receiverAddress, ethers.utils.parseEther(amountToTransfer.toString()), '0x', ethers.BigNumber.from(gasAmount.toString()), ],
    overrides: {
      value: ethers.BigNumber.from(gasAmount.toString()),
    },
    mode: 'recklesslyUnprepared',
  });
  const {
    data: useWaitForTokenTransferTransactionData,
    isSuccess,
    isError,
    isLoading,
  } = useWaitForTransaction({
    // Call a hook to wait for the transaction to be mined
    hash: tokenTransfer ? .hash,
  });
  // token transfer
  const handleTokenTransfer = async() = >{
    if (!sourceChain || !destinationChain || !receiverAddress || !amountToTransfer) {
      toast({
        title: 'Invalid Input',
        description: 'Please fill all the fields correctly.',
        status: 'error',
        duration: 5000,
        isClosable: true,
      });
      return;
    }
    if (write) {
      write();
      toast({
        title: 'Transaction Submitted',
        description: 'Please confirm the transaction in Metamask.',
        status: 'info',
        duration: 5000,
        isClosable: true,
      });
    }
    if (isError) {
      toast({
        title: 'Transaction Error',
        description: 'There was an error submitting your transaction.',
        status: 'error',
        duration: 5000,
        isClosable: true,
      });
    }
  };
  return (
  //...
  );
};
### Track transaction status and update the UI

Add the following code to track the transaction status after triggering the interchainTransfer() method. To do this, you will need to add the following code in useEffect hook:
//...
const TransferToken = () = >{
  //...
  useEffect(() = >{
    gasEstimator();
    if (isSuccess) {
      setDisplayTransactionHash(tokenTransfer ? .hash ? ?'');
      toast({
        title: 'Token Transfer Initiated',
        status: 'success',
        duration: 5000,
        isClosable: true,
      });
    }
    if (isError) {
      toast({
        title: 'Transaction Error',
        description: 'There was an error submitting your transaction.',
        status: 'error',
        duration: 5000,
        isClosable: true,
      });
    }
    if (isLoading) {
      toast({
        title: 'Transaction Pending',
        description: 'Your transaction is pending.',
        status: 'info',
        duration: 5000,
        isClosable: true,
      });
      if (isSpendSuccess) {
        toast({
          title: 'Token Approved',
          status: 'success',
          duration: 5000,
          isClosable: true,
        });
        setApproveButtonVisibility(false);
        setFormVisibility(true);
      }
    }
  },
  [tokenTransfer, isSuccess, isError, isLoading, useWaitForTokenTransferTransactionData, useWaitForTransactionSpendData, ]);
  return (
  //..
  )
}
Update the UI to implement the token transfer functionality
To connect the token transfer implementation to the UI, update the code using the following snippet:
const TransferToken = () => {
  //...

  return (
    <Box
      padding="7"
      maxW="xxl"
      borderWidth="1px"
      borderRadius="lg"
      overflow="hidden"
      margin="auto"
      marginTop="-20"
    >
      {/* ... */}
      <VStack spacing={5} align="stretch">
        {formVisibility && (
          <>
            <FormControl>
              <FormLabel>Source Chain Name</FormLabel>
              <Stack spacing={3}>
                <Select
                  placeholder="Select source chain"
                  value={sourceChain}
                  onChange={(e) => setSourceChain(e.target.value)}
                  size="md"
                >
                  {/* ... */}
                </Select>
              </Stack>
              <FormHelperText>
                Source chain for your token e.g., Fantom, Binance, Polygon, etc.
              </FormHelperText>
            </FormControl>

            <FormControl>
              <FormLabel>Token Contract Address</FormLabel>
              <Input
                placeholder="Enter Token Contract Address"
                value={interchainTokenContractAddress}
                onChange={(e) =>
                  setInterchainTokenContractAddress(e.target.value)
                }
              />
              <FormHelperText>
                Contract address of the token you want to transfer.
              </FormHelperText>
            </FormControl>

            <FormControl>
              <FormLabel>Destination Chain</FormLabel>
              <Stack spacing={3}>
                <Select
                  placeholder="Select Destination chain"
                  value={destinationChain}
                  onChange={(e) => setDestinationChain(e.target.value)}
                  size="md"
                >
                  {/* ... */}
                </Select>
              </Stack>
              <FormHelperText>
                Destination chain for your token e.g., Fantom, Binance, Polygon,
                etc.
              </FormHelperText>
            </FormControl>

            <FormControl>
              <FormLabel>Receiver Address</FormLabel>
              <Input
                placeholder="Enter Receiver Address"
                value={receiverAddress}
                onChange={(e) => setReceiverAddress(e.target.value)}
              />
              <FormHelperText>Receiver address for your token.</FormHelperText>
            </FormControl>
          </>
        )}

        <FormControl>
          <FormLabel>Amount to Transfer</FormLabel>
          <Input
            placeholder="Enter Amount to Transfer"
            value={amountToTransfer}
            onChange={(e) => setAmountToTransfer(Number(e.target.value))}
          />
          <FormHelperText>
            Amount to transfer to the receiver address.
          </FormHelperText>
        </FormControl>

        {approveButonVisibility && (
          <Button
            colorScheme="blue"
            onClick={handleApprove}
            isLoading={isSpendLoading}
            loadingText="Approving Token..."
            w="sm"
            variant="solid"
            disabled={isSpendLoading}
          >
            Approve
          </Button>
        )}

        <Button
          colorScheme="cyan"
          onClick={handleTokenTransfer}
          isLoading={isLoading}
          loadingText="Transferring Token..."
          w="sm"
          variant="solid"
          disabled={isLoading}
        >
          Transfer Token
        </Button>
      </VStack>
    </Box>
  );
};
Ensure you replace {/ ... /} with the actual code. This placeholder prevents the repetition of existing code in the codebase.
Test the application to transfer tokens between chains
First you need to approve the amount to be spent.
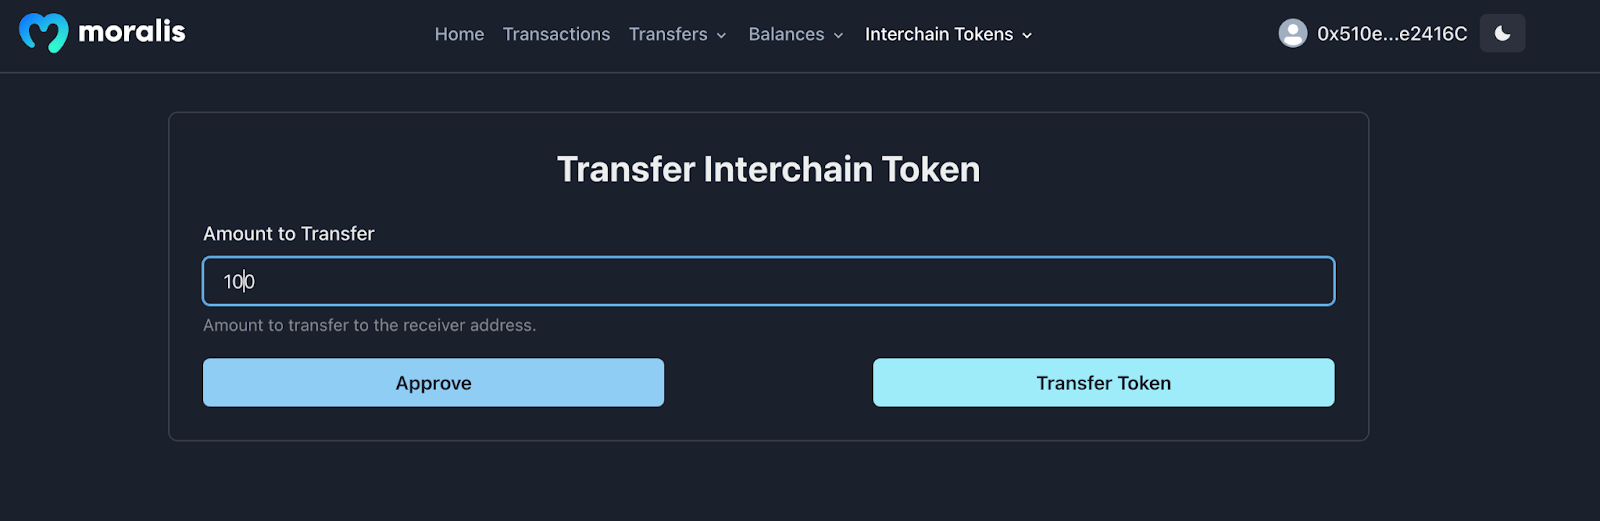
Next, Add all the required information below, including the amount you want to transfer.
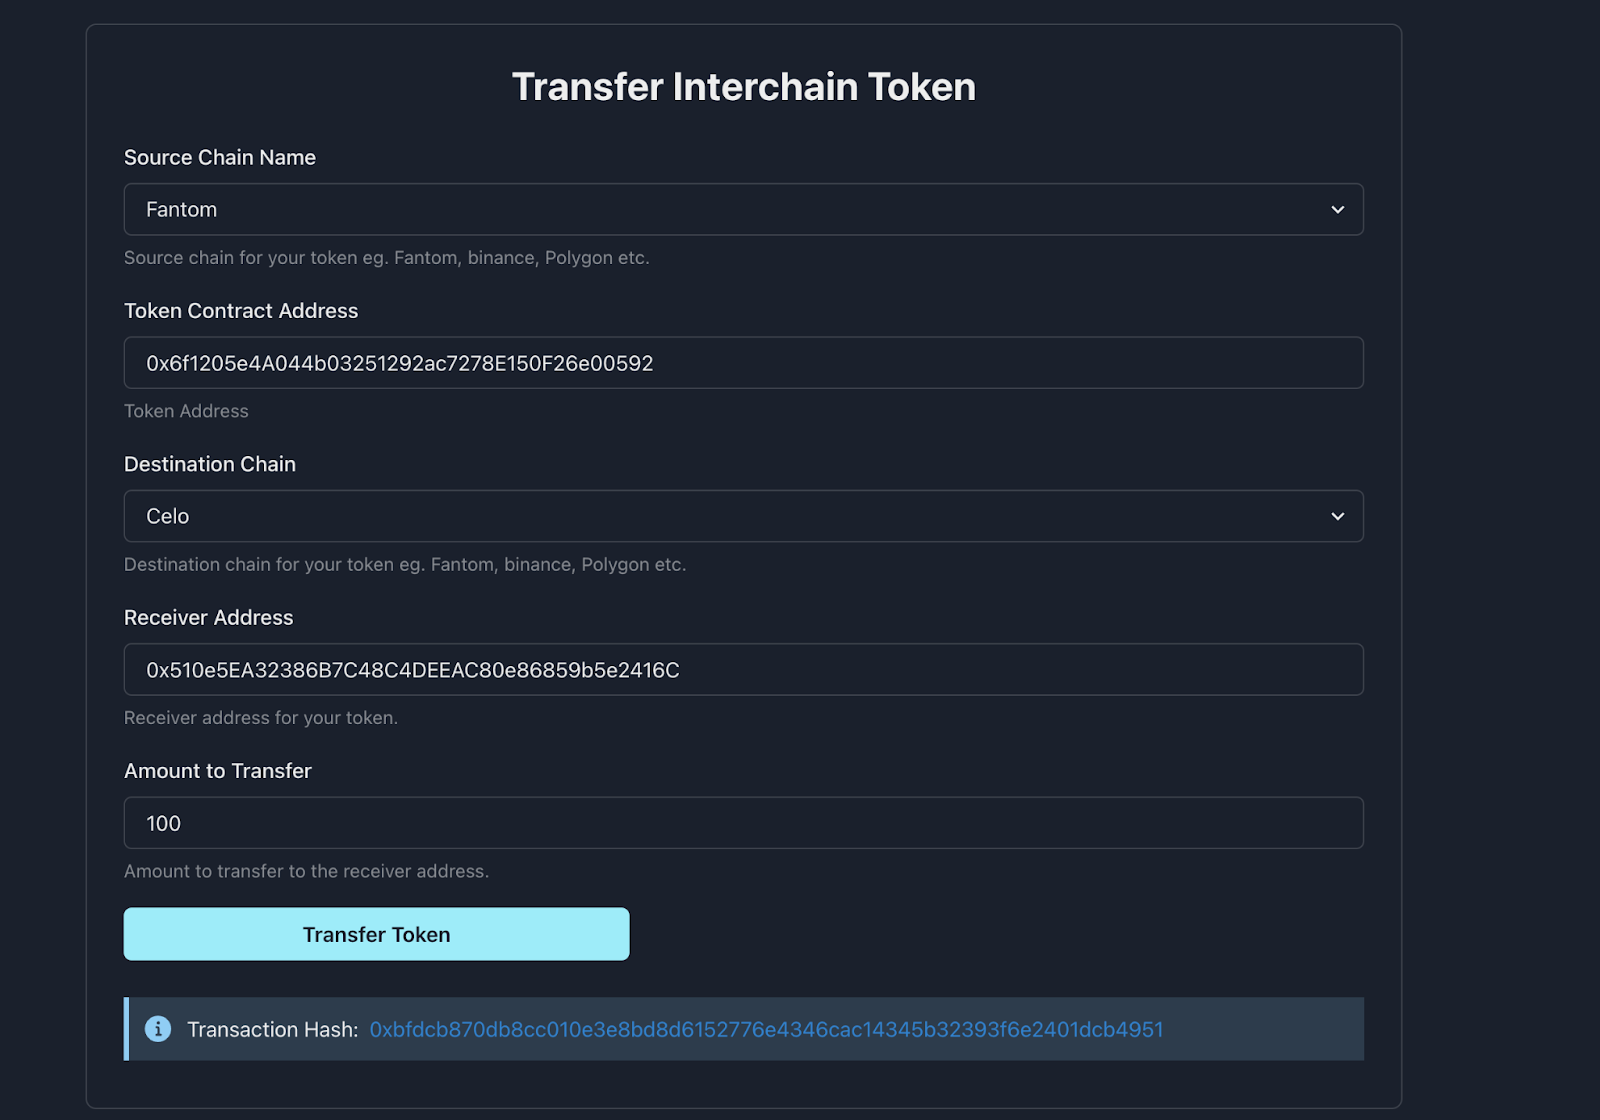
Check the transaction on the Axelar testnet scanner
Check the Axelarscan testnet scanner to see if you have successfully transferred some of your tokens from the Fantom testnet to the Celo testnet. It should look something like this.
Check the transactions using Moralis API
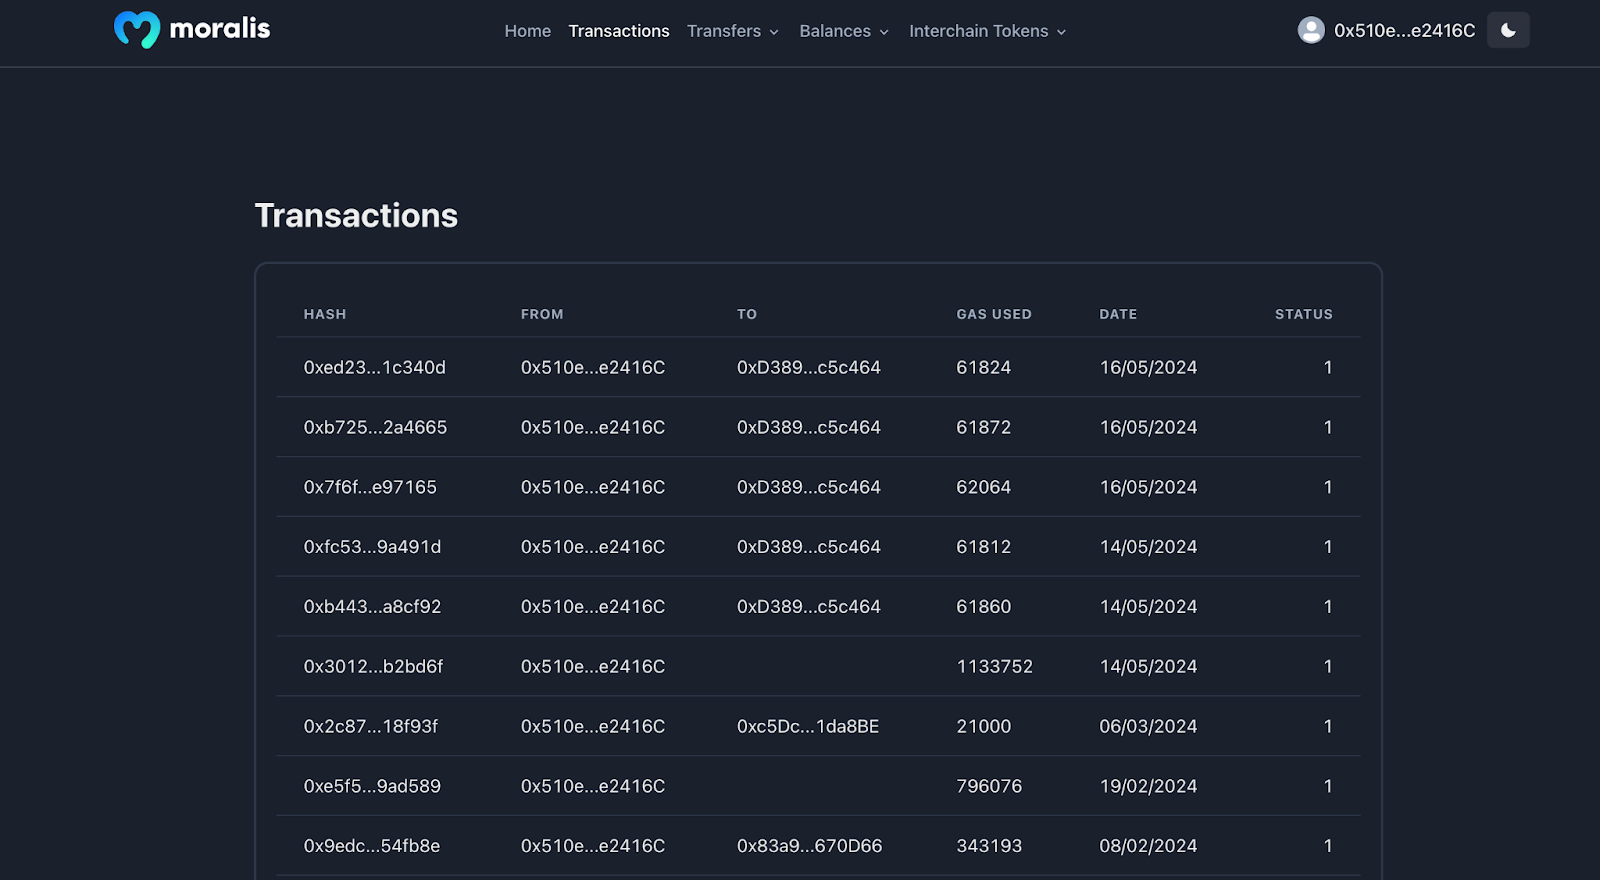
You can also check the transactions directly from your application. Navigate to the Transactions tab on the menu. You should see a list of transactions done by the connected wallet address so far, which was implemented using the useEvmWalletTransactions hook from Moralis inside the Transactions.tsx page. You can learn more about how to get transactions by user address here.
When you navigate to the transactions page on your browser, you should see a table similar to the one below.
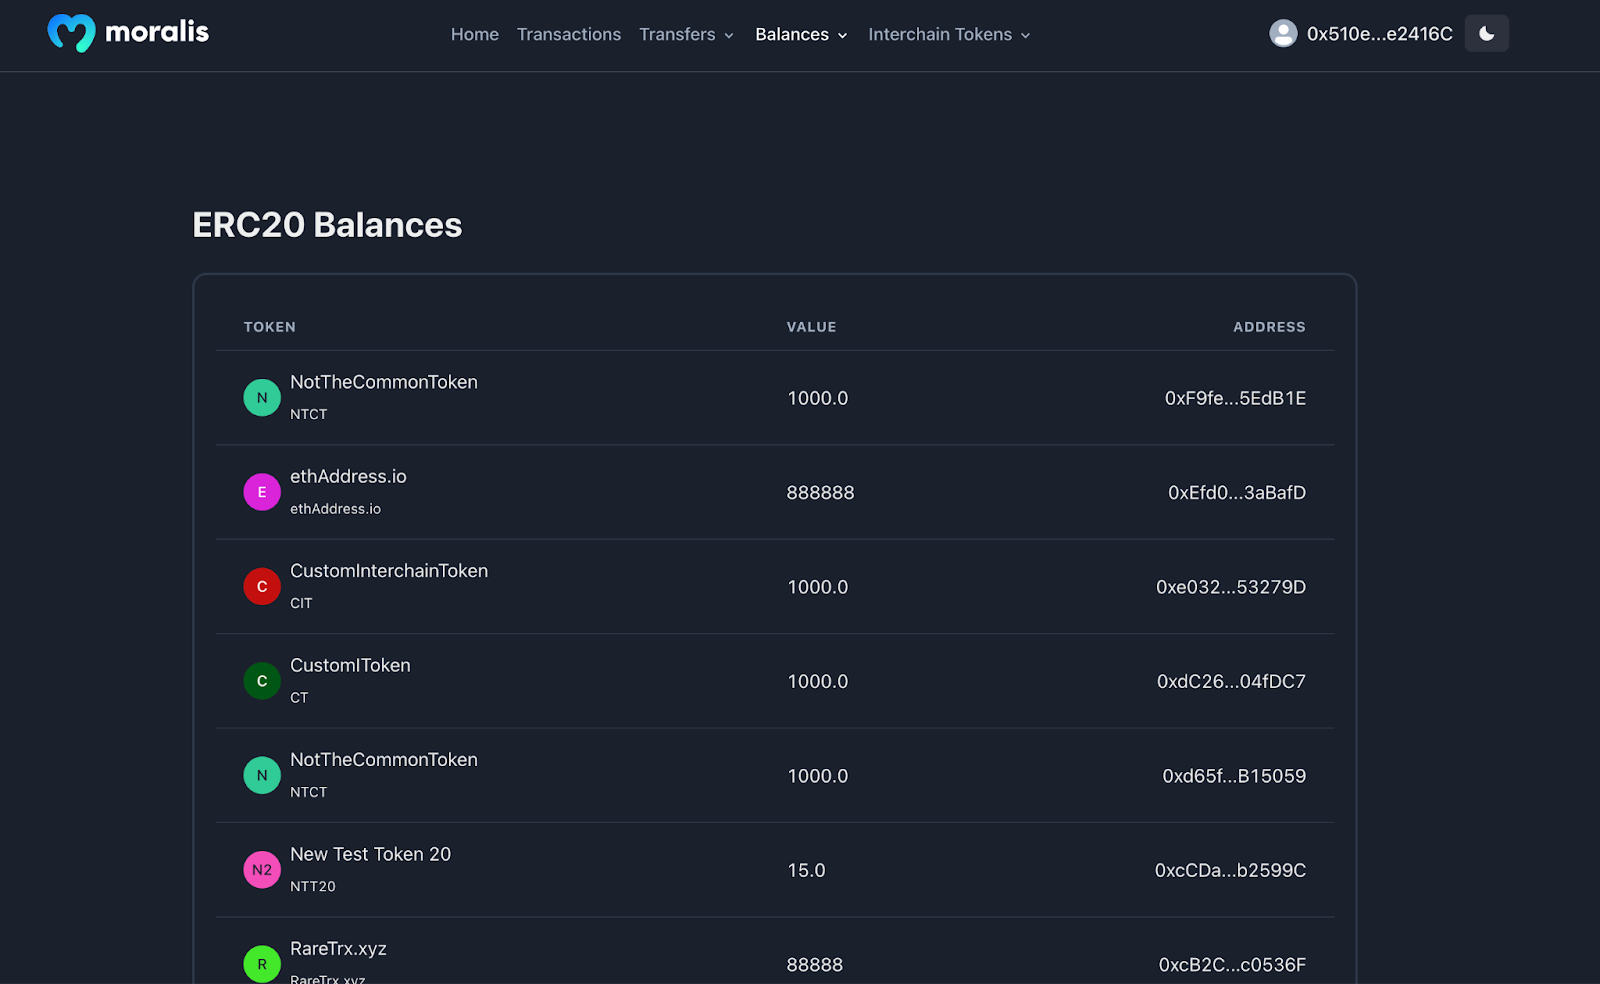
Check the ERC-20 asset balance with Moralis API
You successfully created and transferred a new ERC-20 token from the Fantom testnet to the Celo testnet. To track the asset balance of the address you transferred to, you can connect the address, navigate to the Balances tab, and click ERC20, which was implemented using the useEvmWalletTokenBalances hook from Moralis.
useEvmWalletTokenBalances is a function that comes with the imported Moralis package and queries all of a user’s ERC-20 tokens for a specific wallet address at a given chain ID.
Learn more about retrieving ERC20 programmatically in dapp here.

When you navigate to the balances page on your browser, you should see a table similar to the one below.
Woohoo! Congratulations, you have just completely built and deployed a multichain token across two blockchains using the Moralis Ethereum Boilerplate. Great job making it this far!
What's next
You can also explore other functionalities of the Interchain Token Service, such as:
- Creating a new custom Interchain Token
- Turn deployed tokens on multiple chains into Interchain Tokens
References
- Moralis
- Moralis Docs
- Ethereum Boilerplate
- Interchain Token Service Documentation
- Interchain Tokens GitHub Repository
- AxelarJS SDK